
Actually; this post is meant for our internal clients; however any other person may find it very useful.
Have you read my previous article on Updating your WordPress site, it’s an introduction to Posts and Pages. if you haven’t. I strongly insist you do so. Afterwards head back here to digest this.
You are quite aware that to keep your site upto date, you need to keep creating new articles.
The first step is to login into your WordPress backend dashboard: Here is how it looks like.

Afterwards; navigate to the Post menu, hover or click to reveal the sub-menus
There you are, the sub-menus are self explanatory. Now lets create a post:
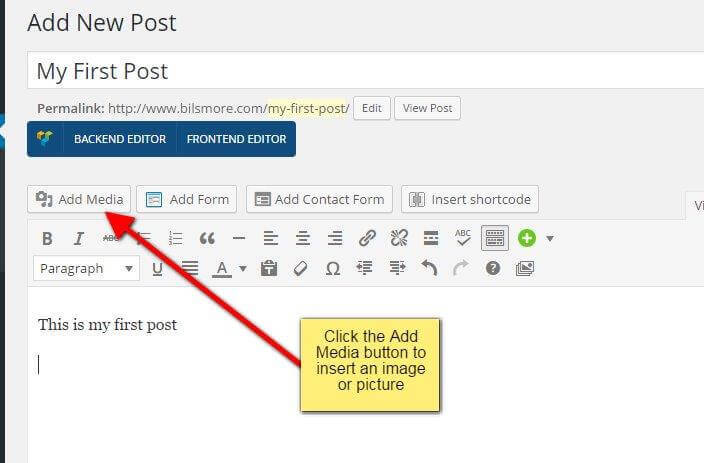
Creating a post is easy and involves only three things:
- Your Topic or Title
- Contents and images
- Featured image if available.
See below and follow the notes

Now lets add an image to our article. Images are important for various reasons; to enhance the beauty of your write-up or for further illustration. Now I’ll show you the same way I added the screenshots so you can understand the tutorial better.
The Add Media button immediately before the editor bar is your Go-to-tool.
Now you have clicked the Add Media button. Your WordPress site stores images you have uploaded into a folder. that folder will be displayed to you with the option to upload more files. You can either select an existing image or upload a new one.

Afterwards select the the desired image, check the details section too.

You have the option of editing your image and performing other actions. When you are done. Click Insert into post. Remember you can easily re-size and select whichever alignment option on the image. Simply click the image and the alignment options will pop up.
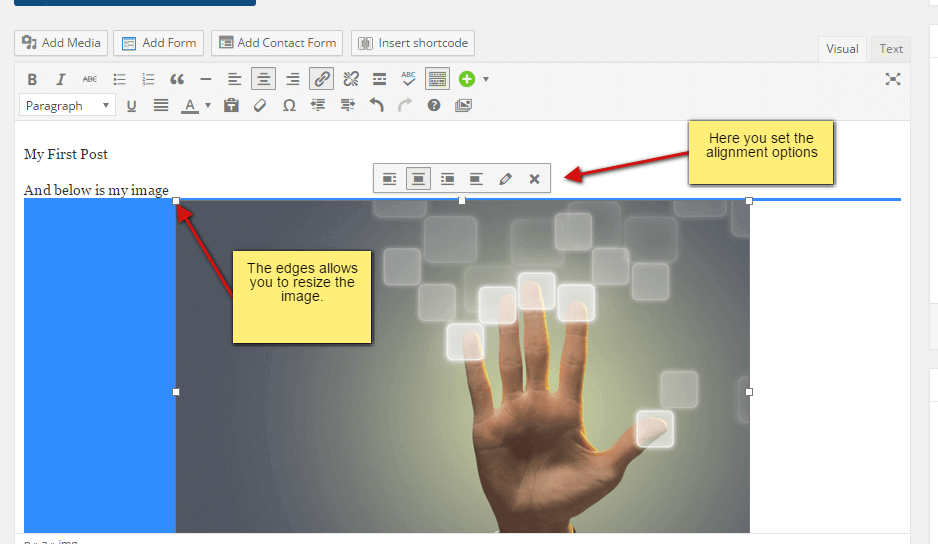
And that is all about inserting an image into your article.
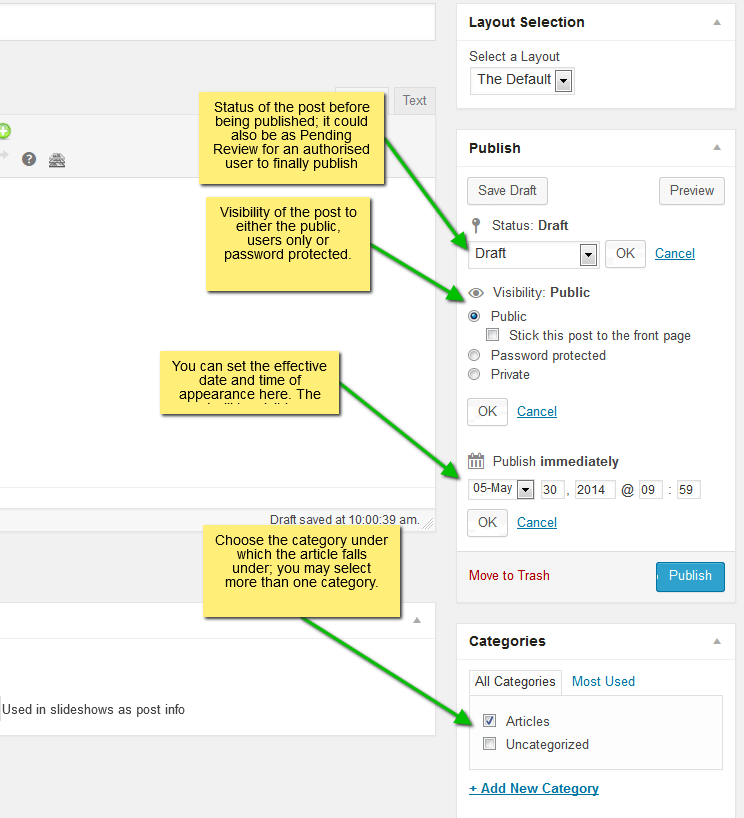
Basically we have just created a post; how about for more options. The widget section by the right side of you page contains some extended features which are explained below:
Humpty dumpth dump.
We are done.
And in-case your WordPress Post layout is configured separately; we call it Custom Post Type. Not to worry, simply click on the custom Post e.g. News and repeat the same process.
Thank you Zion,
Your article was precise and straight to the point
Wao, I love the way you used the screenshots and screen-tips. Very very superb, no too much story and detailed
Thank you so much for this very useful article! Found it very helpful!
Thank you for your sharing. I am worried that I lack creative ideas. It is your article that makes me full of hope. Thank you. But, I have a question, can you help me?
Your point of view caught my eye and was very interesting. Thanks. I have a question for you.
Your point of view caught my eye and was very interesting. Thanks. I have a question for you.
Your point of view caught my eye and was very interesting. Thanks. I have a question for you.
Your article helped me a lot, is there any more related content? Thanks! https://accounts.binance.com/register?ref=P9L9FQKY
Your point of view caught my eye and was very interesting. Thanks. I have a question for you.
Your article helped me a lot, is there any more related content? Thanks!
Your point of view caught my eye and was very interesting. Thanks. I have a question for you.
Your point of view caught my eye and was very interesting. Thanks. I have a question for you.
I don’t think the title of your article matches the content lol. Just kidding, mainly because I had some doubts after reading the article.
Nice post. I used to be checking constantly this weblog and I’m impressed!
Extremely useful info specifically the final phase 🙂 I handle
such info a lot. Iwas seeking this particular info for a lonng time.
Thank you and good luck. https://Hallofgodsinglassi.Wordpress.com/
Your point of view caught my eye and was very interesting. Thanks. I have a question for you.
Your article helped me a lot, is there any more related content? Thanks!
Your article helped me a lot, is there any more related content? Thanks!
Can you be more specific about the content of your article? After reading it, I still have some doubts. Hope you can help me. https://accounts.binance.com/pl/register?ref=UM6SMJM3
Hệ thống link 66b tự động sao lưu dữ liệu – bạn sẽ không mất tiến trình chơi dù đổi thiết bị. TONY12-30
Your point of view caught my eye and was very interesting. Thanks. I have a question for you. https://accounts.binance.info/ar/register-person?ref=PORL8W0Z
Không chỉ dừng lại ở các trò chơi truyền thống, xn88 còn tiên phong trong lĩnh vực cá cược Esports với tỷ lệ kèo cạnh tranh. Những giải đấu đỉnh cao như CSGO hay Dota 2 đều được tích hợp đầy đủ, mang lại sự lựa chọn phong phú cho giới trẻ hiện đại. TONY03-11O
Thanks for sharing. I read many of your blog posts, cool, your blog is very good.
Đặc biệt hơn, 888slot com apk còn hợp tác với 24+ NPH Slots khác nhau như: TTG, NETENT, 93 CN, FastSpin, BOLE,… Bạn có thể thử sức với hơn 2.300+ trò chơi quay hũ siêu hot được phát hành mỗi ngày. Tối đa 50 dòng thanh toán có thể giúp bạn hốt về bộn tiền từ game slots. TONY03-25
Slot game tại mã nhận thưởng 888slot được phát triển bởi các nhà cung cấp hàng đầu thế giới như Pragmatic Play, Microgaming, NetEnt – chất lượng không cần bàn cãi. TONY04-08
Can you be more specific about the content of your article? After reading it, I still have some doubts. Hope you can help me. https://sunfoodstories.com/neujahrs-intentionen-ein-neues-jahr-manifestieren/#comment-6078
xn88 là nền tảng cá cược trực tuyến được nhiều người chơi Việt Nam tin tưởng nhờ hệ thống link truy cập ổn định, không chặn và bảo mật cao. Giao diện được tối ưu cho cả mobile lẫn PC, tốc độ tải nhanh, dễ thao tác, phù hợp cho cả người mới lẫn bet thủ lâu năm. TONY05-09
888slot không chỉ là nơi giải trí mà còn là đối tác tin cậy, giúp quý khách hiện thực hóa những kỳ vọng về tài chính. Hãy truy cập trang đại lý chính thức để nhận link vào an toàn và bắt đầu hành trình chinh phục những đỉnh cao mới. TONY05-28